The month of October is National Breast Cancer Awareness Month. During this month, various organizations work to raise awareness about the disease, as well as funds for breast cancer research. One thing that is often stressed when raising awareness about the disease is that early detection is ideal for better treatment outcomes. For this reason, many women’s health doctors recommend having regular breast exams, as well as mammograms in some cases.
Besides having physical exams performed by your doctor, it is also encouraged to practice self-examination in order to notice any tiny changes in your breasts. Although self breast exams have not been shown to effectively detect breast cancer, they are still important because they help you to become familiar with what is normal for your breasts. Knowing what is normal or abnormal for your breasts is an important step in recognizing changes that could be potentially dangerous. However, it is important to note that there are many conditions that can cause changes in your breasts, not just breast cancer.
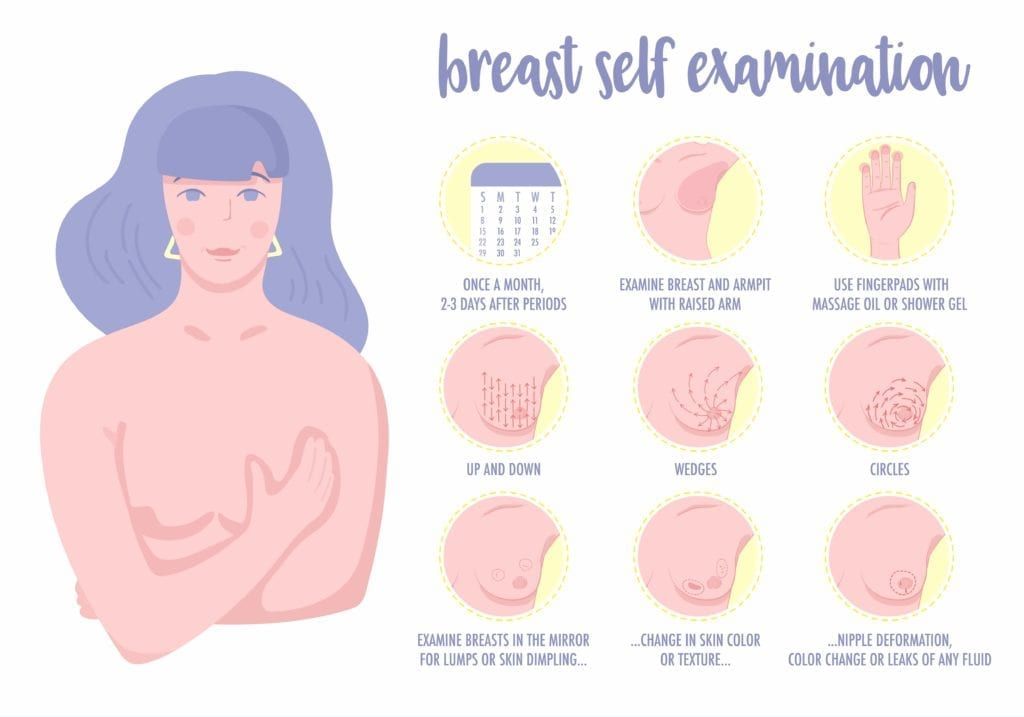
Ideally, self breast exams should be performed at least once a month. This allows you to get accustomed to the normal look and feel of your breasts. The best time to examine your breasts is several days after your period ends so they are no longer swollen or tender. There are five basic steps to performing a self breast exam, including:
Step #1:
While topless, place your hands on your hips and face the mirror with your shoulders straight. Looking into the mirror, you should see breasts that are their normal size, shape, and color, and that are evenly shaped. During a visual examination, if you notice any swelling, distortion, redness, or a rash, make sure to mention this to your doctor. You should also mention if your nipples have changed position or inverted. Finally, check for changes in your skin texture such as dimpling, puckering, or bulging. Make sure to write a note listing any changes you have noticed.
Step #2:
While looking for the same changes, raise your arms so that your hands meet above your head. Again, your breasts should be evenly distributed and you should see no signs of swelling or skin irritation.
Step #3:
Check your nipples for signs of fluid leakage. Fluid that comes out of one or more nipples can be watery, milky, bloody, or yellowish in color.
Step #4:
While lying down, use your right hand to feel your left breast and vice versa. You will want to keep your fingers flat and together while using small circular motions to firmly touch your breast. Starting at your collarbone, be sure to cover the entire surface of your breast all the way down to your abdomen, as well as across from armpit to cleavage. It may be helpful to use a specific pattern to make sure the entire breast gets examined. You will also want to vary the amount of pressure you use depending on the type of tissue. For example, you will want to use light pressure on the skin, medium pressure on the tissue in the middle of your breasts, and deep pressure for the tissue in the back of your breasts.
Step #5:
While standing or sitting, repeat the procedure listed above. Many women find that it is easiest to perform this part of the exam in the shower when their skin is wet and slippery. Just as it was mentioned above, be sure to thoroughly examine the entirety of both breasts.

Dr. Geoffrey Zann is a Certified Robotic Da Vinci Surgeon, Board-certified by the American College of Obstetricians and Gynecologists, and a Diplomat of the American Board Obstetrics of Gynecology. He has been a member of the American Society for Colposcopy and Cervical Pathology, American Association of Gynecologic Laparoscopists, and the Hugh R. K. Barber Obstetric and Gynecologic Society.